This is the sample Flight Plan referenced in the "Any Excuse-11R Article" (publication pending). The article was written to encourage pilots to exercise their skills by flying from anywhere to anywhere in Texas. By doing so it pointed to a savvy pilot who understands the need to remain proficient and at the same time provide an opportunity for his family to also enjoy his adventure of flying by traveling to a place that would satisfy each of the other members of the family as well.
This article can also be found under the compilation of work written by Harry J. Perez a contributor to the Three Lights Green Library.
On this Flight Plan we will travel from Texarkana (KTXK) to Brenham (11R) in central Texas and we will be utilizing the iPad tablet with the ForeFlight App for flight planning purposes. If your iPad has GPS capability you can use this tablet as a backup only to your panel mounted GPS equipment, since it is not authorized by the FAA for your primary source of navigation. Regardless of the App that you will use for flight planning, this approach is revolutionizing that process and placing most, if not all, of the steps in one location. It will eliminate a great deal of searching, not to mention paper, for the various pieces that are required for a comprehensive flight plan.
If you wish you can review an article that was originally published in the March 2012 issue of the American Bonanza Society Magazine describing a iPad demonstration at the ABS convention in October of 2011. The demonstration provided a brief synopsis and comparison of several apps in the market that can be used for flight planning and navigational backup. This same article can be found as part of a compilation of work here at the Three Lights Green Library under iPad-What Works for You.
The presenter in two 1-hour sessions skillfully articulated the pros and cons of the various apps that were available to her from the vendors participating (http://www.danaperez.com/ESP/iPad_App_Review.htm).
For additional information you can email her at: AviateESP@me.com or visit her website at: www. danaperez.com.
The Flight Plan:
Leg 1
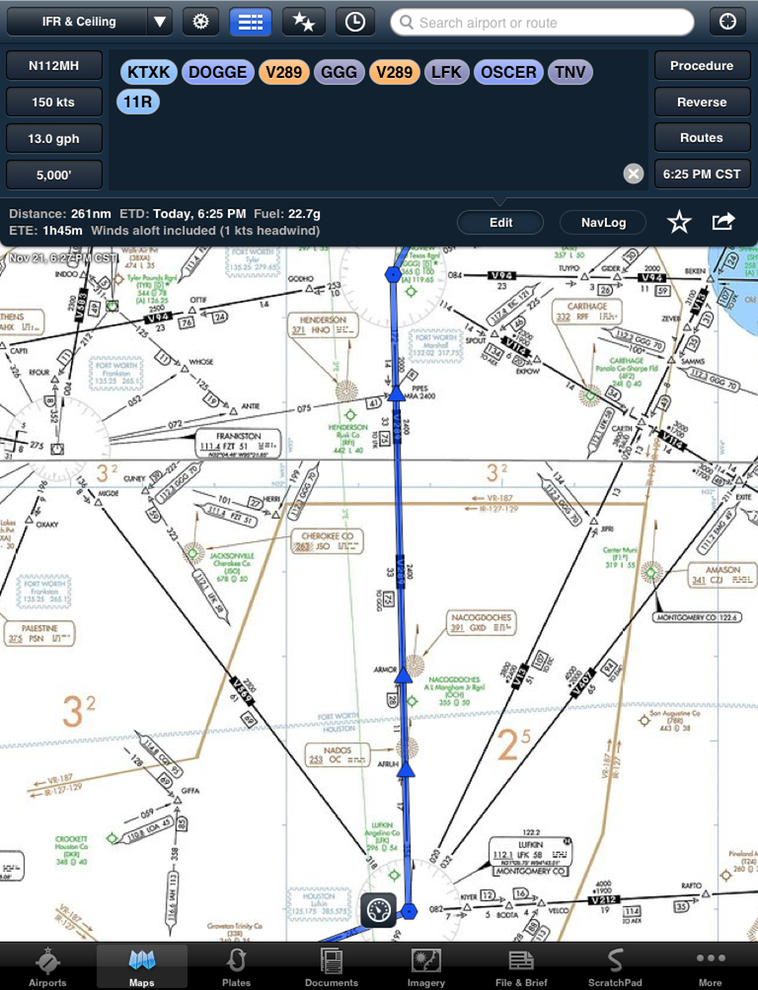
Leg 2
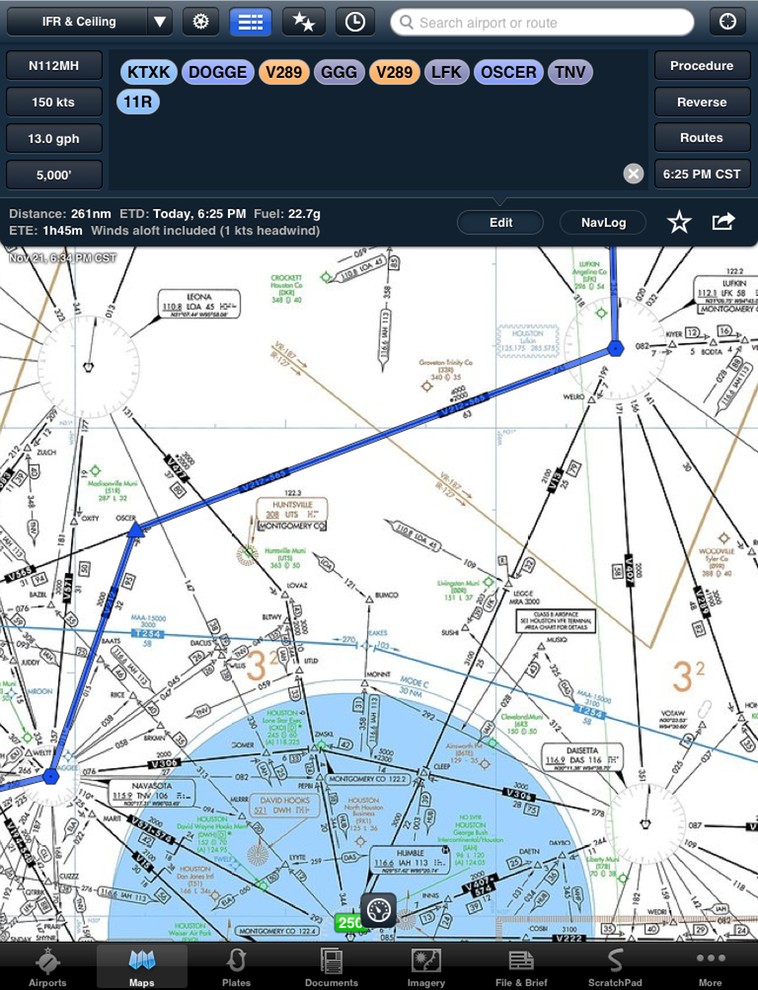
Leg 3
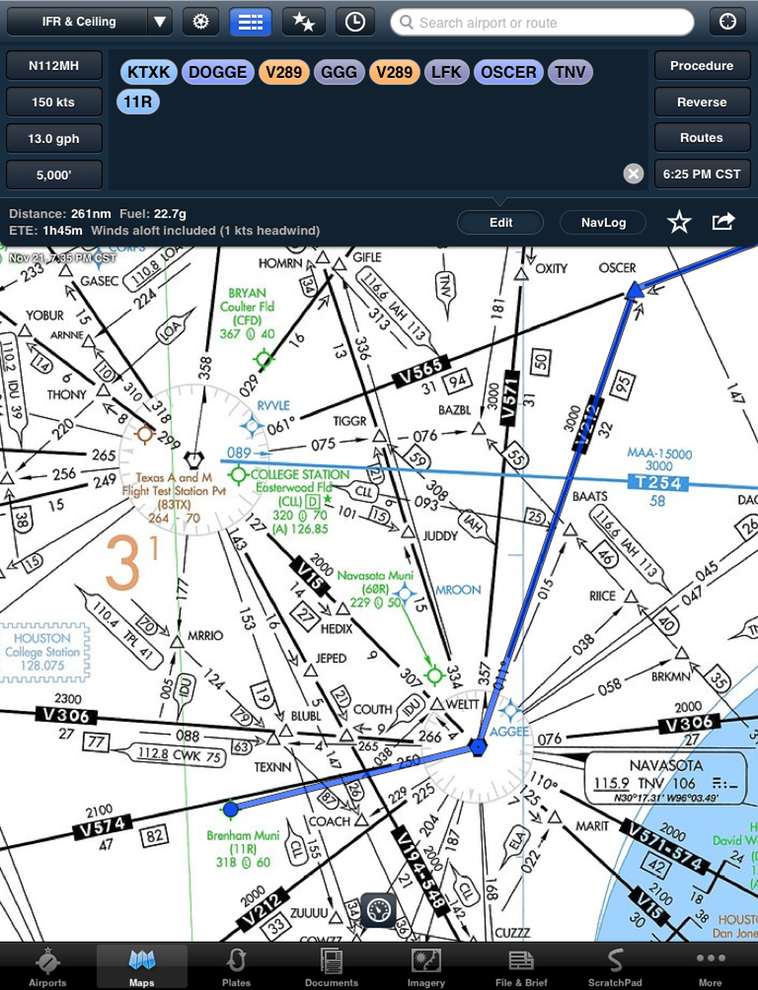
Leg 4
STEP 1:
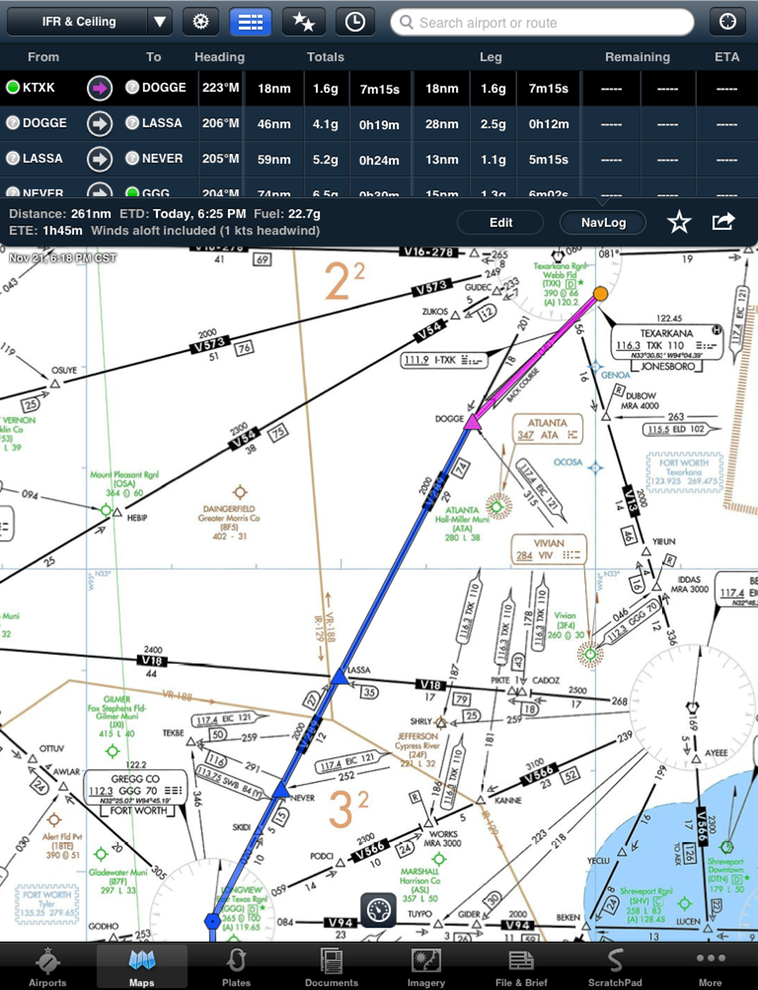
We are ready to sit down and plan Leg 1 of our adventure by using your iPad with the ForeFlight App. With the app open and connected to the Internet, the first thing to do is to slide down the menu bar as shown at the bottom of each leg and touch the File & Brief page. Assuming that you already know the airport identifier for the Texarkana Airport (KTXK), you develop the information on the form provided by Flight Service, all basic info that you normally have to fill in or provide them when filing a Flight Plan in the past.
Next, you want a briefing, and right on that same page you touch the briefing button and it will automatically bring up the entire briefing covering everything concerning your flight to the Brenham Airport (11R). The information will be identical to what DUATS will provide you, such as; current weather for both departure and arrival airports, FA synopsis and VFR clouds/weather, FA turbulence, severe weather warnings, convective sigmets, airmets and notams. While you may not be ready to actually file the flight plan you can leave that page and take care of some other elements of you flight and come back later.
But before you leave the page you are on, you can now touch the maps page to bring up the the map for the route you have selected to visually review your flight as on Leg 1, shown above.
STEP 2:
After carefully reviewing your route on the map provided you will want to review the critically important airport data, such as; frequencies, runway descriptions, procedures, services of both the departing and arrival airports. Simply go to the menu as shown on Step 1 and touch the Airports Button. Here you can call up from your favorites and select the airports (alternate as well) you have chosen for data desired. If you do not yet have them in your favorites, tag the big Q (search for airport) at the upper right hand corner and type the airport Identifier- 11R. You used to go to the FAA published Airport/Directory and you still should have one handy to be legal, but now it is here right at your finger tips in your iPad.
If you are traveling on a VFR flight plan you are now set to go. Now go on to Step 4.
But should you be traveling on an IFR flight plan, then the next bit of valuable information you need is a variety of current weather information that is beyond your briefing such as; radar, satellite, TFR's, Air/Sigmets, flight rules, ceilings, PIREPS, and more. To access this information scroll back up to the Leg charts above and at the upper left hand corner you will see IFR & CEILING with an upside down triangle-touch and select any 2 subjects. You can only choose 2 at any one time on this application. The information will pop onto your MAPS page in the form of boxes with numbers if you are asking for ceilings; red boxes for IFR and blue boxes for VFR, the wind symbol for wind information, green boxes with numbers for temperatures and so on. Radar, if you have selected it, will also depict the current movement of any thunderstorm activity should any exist at the moment you are viewing the screen. Please keep in mind this data is only visible while you are on the Internet and will NOT be available in flight. You must download the information before disconnecting from the Internet. There are additional devices that will address the GPS capability of your ForeFlight Application to your iPad.
STEP 3:
Since you are going to cover all of your bases by filing a IFR Flight Plan, the next thing that you want to review are the various procedures that are available to you for the airports that you have selected. While your were on the Airports page you learned what frequencies you will use, you checked the current weather at each airport, you are now fully aware of what runways are available and what the layout of the airports looks like by reviewing the Runway button, the chart at the top of the page and/or touching the A/FD button.
Now touch the Procedures button to review the various options available to you on your flight. There are four major elements that you will see went you call up this button; Airport, Departure, Arrival, and Approach. The first one is Airport-Hot Spot - " is a location on an aerodrome movement area with a history or potential risk of collision or runway incursion and where heightened attention by pilots is necessary." By touching one of the next three; Departure, Arrival, and Approach, a visual display will appear of the various procedures available at that airport. It will name the procedure and touching it will immediately bring up the specific Plate associated with that procedure. You now either save it to your Plate page for inflight use or you can print it if a hard copy is preferred. Of course your panel mounted GPS will contain these current procedures and you will rely on it to execute the actual procedure while viewing the Plate for confirmation and adherence to the limits depicted.
Should you not be using FAA certified GPS equipment, then these procedures will still be required, but you will most likely need a vector or waypoint in order to reach the initial approach fix with your RNAV or VOR equipment.
STEP 4:
As a typical pilot you are going to double check and triple check everything. You will review all of your checkpoints, waypoints and ensure that your alternatives are all viable. If you have decided to fly the entire route without stopping along the way, then you will utilize each chart as a tool to guide you to your final destination.
The chart at the top of leg1 has automatically displayed all of your waypoints just as you have always done in your pilotage mode. It will give your heading, distance to first checkpoint (Dogge Intersection), how much fuel you will use, and how much time it will take to get there. Furthermore it will repeat in progression the remaining checkpoints with the sum total for each category. It will also give you an opportunity to see any favorites routes that ATC may have issued recently. Additionally, you can Send To the File & Brief page the data contained on this chart, you could Email to someone (yourself) or you could send it to a Printer so that you can have the data you requested in hard copy. As I mentioned earlier almost everything is at your fingertips in one easy to access location - the iPad.
Your final double/triple check is of course the weather. Before heading back to the File & Brief page, now look at the Imagery page, which contains such neat Features; flight rules, composite with tops, latest surface analysis and freezing levels. You can view the turbulence and icing charts, look at Doppler radar, and the latest PIREPs. Check out the AIRMETS/SIGMETS and the latest Outlook. Also, you must take another look at the briefing furnished by the ForeFlight App.
Now you’re almost ready to go. The final step is to return to the File & Brief page and get ready to file your Flight Plan. Take one last look at the information you furnished on the form provided by the app. If you're ready, you now can touch the File button that is color coded in green signifying GO!
If you furnished your email address you will receive an email confirming that your Flight Plan has been filed and providing you with the anticipated routing data including any departure and/or arrival procedures you will be expected to fly. This will assist you to prepare or change/gather any information/charts that you did not previously have available. Keep in mind that when you receive your final ATC clearance just before takeoff that you may receive different routing information then what you were expecting. This is why it is important to download as much information as you can that may be relevant to your flight before you disconnect from the Internet.

Photo provided by Dana Perez
Have a Safe Flight!
